
Join our mailing list and get the full PIPE DECOR® experience in 2026
We're introducing some new exciting perks for our members in 2026... Don't miss out.

We are constantly amazed at the boundless creativity and ingenuity within our PIPE DECOR® community. You always amaze us with your innovative projects, transforming spaces with a blend of functionality and unique style. Today, we’re excited to shine a spotlight on two exceptional DIY projects that embody the spirit of custom DIY furniture. Whether you’re a seasoned DIY expert or a beginner eager to explore the world of DIY, these projects serve as inspiration, demonstrating the remarkable versatility of PIPE DECOR®
From a kitchen table with a story to tell, to a sleek, minimalist coffee table, let’s dive into these creative endeavors that beautifully showcase how PIPE DECOR® can be the cornerstone of your next DIY masterpiece.
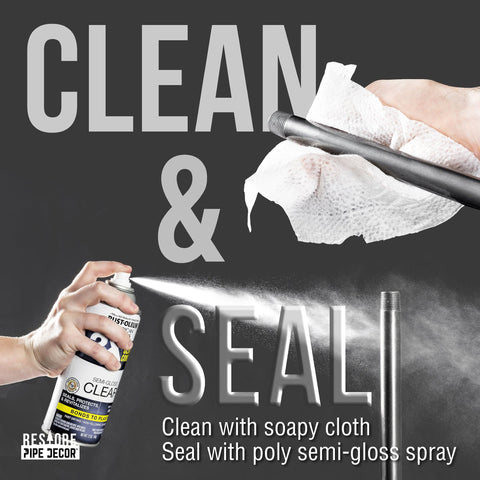
It’s crucial to start any DIY project with industrial pipes by cleaning and sealing them. This not only ensures a sleek, professional look but also prevents rust and preserves the integrity of the metal and makes it last longer. We’ve written an in-depth guide on how to clean and seal your pipes with tips on how to avoid rust to ensure your pipe furniture Last longer. Read our blog on How to Prevent Rust in Pipe Furniture to prep your pipes before any DIY project. Taking the time to prepare your materials properly can make all the difference in the outcome of your project.
Our first project highlight is this remarkable DIY kitchen table that stands as a centerpiece in one of our community member’s homes. This crafty DIYer paired PIPE DECOR® Bridge Table Legs with the weathered elegance of a reclaimed wood door repurposed as a tabletop. The result is a stunning fusion of industrial and rustic styles, breathing new life into salvaged materials.

Materials:
|
PART |
DESCRIPTION |
QTY |
|
A |
8 |
|
|
B |
4 |
|
|
C |
4 |
|
|
D |
6 |
|
|
E |
8 |
|
|
F |
10 |
|
|
G |
2 |
|
|
H |
2 |
|
|
I |
HARDWARE SCREWS |
16 |
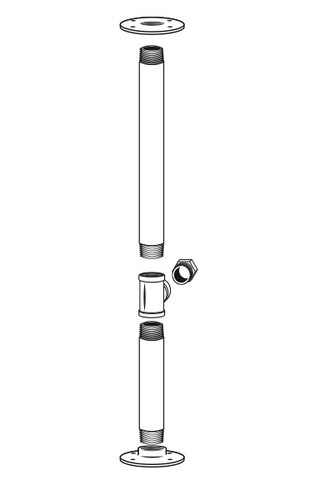
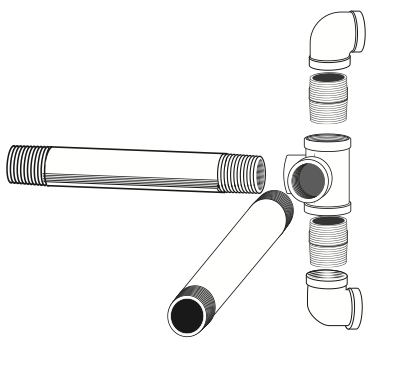
Step1: Assemble Each Leg with 2 X FLANGE (A) 2 X CONNECTORS (B), 2 X ELBOW (C), 3 X 5 IN PIPE (D), and 2 X TEES (E) as shown in Box. Repeat with the other leg.
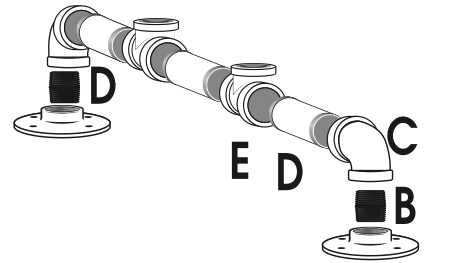
Step 2: Connect 2 X 12 IN PIPE (F), 1 X TEE (E), and 1X FLANGE to Each TEE on the legs.
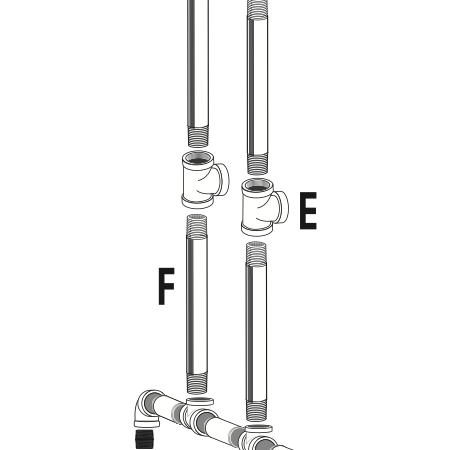
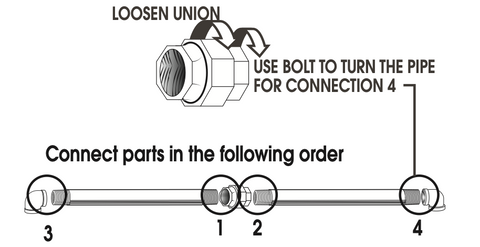
Step 3: Connect the sides using 2 X 12 IN PIPE, 1 X UNIONS(H), and 1 X 18 IN PIPE (G). Screw in the 12 IN and 18 IN PIPE into the union as tight as you can. Screw in one side into a TEE as tight as you can. Loosen the union and screw the other side into the other TEE until tight. Repeat with the other side.
Step 4: Loosen or tighten flanges to level table, and screw into tabletop.
You can choose any wood table top you want for this project. For this example, our creative fan used an old, reclaimed wood door as the tabletop, resulting in sustainable furniture that looks great as a centerpiece! The Bridge Table Legs from PIPE DECOR® is the perfect partner for this amazing dining table as they give it both stability and style.
This second DIY highlight is a testament to the unique aesthetic you get with the combination of pipes and wood. This custom Loop Coffee Table, crafted by a member of our creative community, features the elegant Loop Table Legs set with a beautifully finished piece of wood. The Loop Table Legs provide a modern, minimalist base with a twist while the wood table top offers a warm contrast to the industrial steel with its rich, custom finish.

Materials:
|
PART |
DESCRIPTION |
QTY |
|
A |
8 |
|
|
B |
4 |
|
|
C |
4 |
|
|
D |
4 |
|
|
E |
4 |
|
|
F |
8 |
|
|
G |
2 |
|
|
H |
4 |
|
|
I |
4 |
|
|
J |
2 |
|
|
K |
3/4” SCREWS |
16 |
Step 1: Assemble Each leg with 2 X FLANGE (A) 1 X 4” PIPE (B), 1 X TEE(C), 10” PIPE (D), and 1 X BUSHING as shown in Box 1. Repeat with other legs.
Step 2: Connect legs with 2 X 10” PIPE (E), 1 X SIDE OUT TEE, 2 X CONNECTORS, and 2 X ELBOWS as shown in box 2. Repeat with the other side.
Step 3: Connect sides using 4 X 10” PIPE and 2 X UNIONS. Screw each 10” PIPE as tight as you can by hand into the union. Attach the pipe to the elbow on the union side with no text. Then loosen the union and turn the union bolt to screw PIPE into the other elbow. Tighten union. Repeat with the other side of the loop.
Step 4: Loosen or tighten flanges to level table, and screw into tabletop.
For the wood tabletop, this clever DIYer carefully sanded, stained and sealed the wood top to give it a spectacular finish that complements the loop pipe table legs. It’s a perfect example of how a simple change in materials can lead to a stunning piece of functional art that becomes the focal point of any living space.
We hope these project highlights have you feeling inspired to roll up your sleeves and start creating. These clever DIY projects can be easily done with the help of PIPE DECOR® pipe table legs. Check out our collection so you can start creating your DIY masterpiece today.
Remember, the DIY journey is about creating a space reflecting your unique style and vision. Share your creations with us and join the awesome DIYers of our PIPE DECOR® community. Until next time, keep building, creating, and sharing the DIY love!
We're introducing some new exciting perks for our members in 2026... Don't miss out.
Leave a comment