
Join our mailing list and get the full PIPE DECOR® experience in 2026
We're introducing some new exciting perks for our members in 2026... Don't miss out.

Ready to elevate your space with a touch of DIY? Dive into our step-by-step guide to crafting a sleek, three-tier wood shelf bar cart. This DIY project is designed for both style and function. And with its locking wheels, you can be sure that your drinks or décor move with ease and stay put in style. Ready to roll? Let’s get to it!

|
Part |
Description |
Quantity |
|
A |
24 |
|
|
B |
2 |
|
|
C |
2 |
|
|
D |
2 |
|
|
E |
2 |
|
|
F |
4 |
|
|
G |
4 |
|
|
H |
4 |
|
|
I |
4 |
|
|
J |
4 |
|
|
K |
4 |
|
|
L |
2 |
|
|
M |
2” Nipple |
4 |
|
N |
4 |
|
|
O |
3 |
|
|
P |
Wood Screw |
96 |

Before we start assembling, it's important to clean and seal the steel pipes to ensure that they are free from rust and protected from moisture. Pipe Decor pipes and fittings are coated with a rust preventive oil during manufacturing. You can clean your pipes using regular de-greasing dish soap and Wash Cloths. Here's how:
Step 1: Using your utility sink or your kitchen sink, wash pipes and fittings with warm water and use regular decreasing soap until the oil is removed and rinse well.
Step 2: Using a clean washcloth, wipe the pipes dry. Make sure the pipes and fittings are completely dry before proceeding to sealing.
Step 3: You can seal pipes using either a polyurethane matte or satin finish spray or a finishing wax.
Polyurethane Spray: Spray each dry pipe and fitting with a polyurethane matte or satin finish and wait until completely dry before assembling.
Finishing Wax: Coat each dry pipe with a finishing wax. Wait 20 minutes before polishing with a wash cloth by wiping them down. Faster wiping will result in a shinier finish.
Once you’re done cleaning and sealing all the parts for this DIY project, you can begin with the installation.
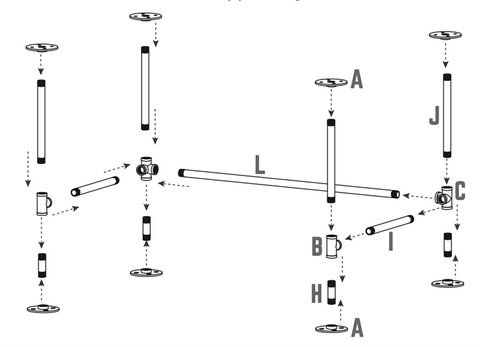
Step 1: Attach flanges, side outlet tee, tee, and nipples together. See Diagram below.
Step 2: With the parts assembled, align and attach the 4 flanges to the bottom of the wood piece using the provided screws
NOTE: Flange holes cannot be perfectly aligned. Rotate top flange approximately 45° to make room for both sets of screws on either side of the wood.
Step 3: Attach another wood piece on the other set of flanges. The completed structure will serve as the base shelf of the bar cart.
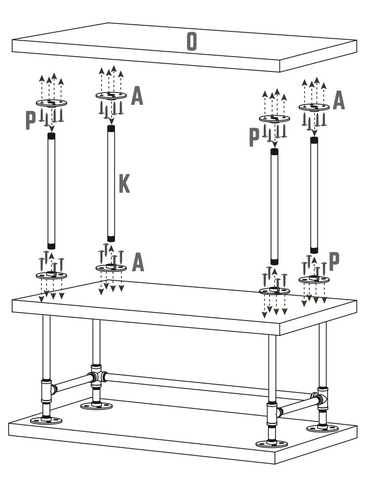
Step 4: Attach flanges to the top of the wooden piece and screw in the 14” nipples to the flanges. Attach the last piece of wood to the remaining exposed flanges.
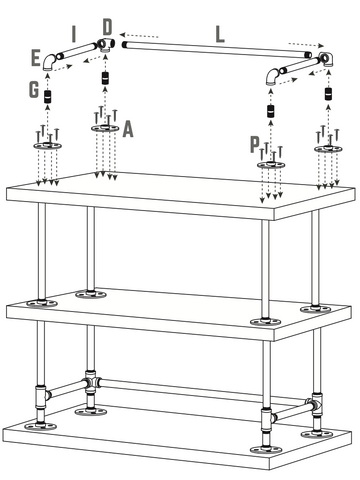
Step 5: Attach 2” nipples to flanges and the elbows and side outlet elbow to the nipples. Connect the 90° elbow to the side outlet elbow with a 6” nipple. Connect the two side outlet tees with the 30” nipple. Attach the assembled part to the wood piece using included screws.
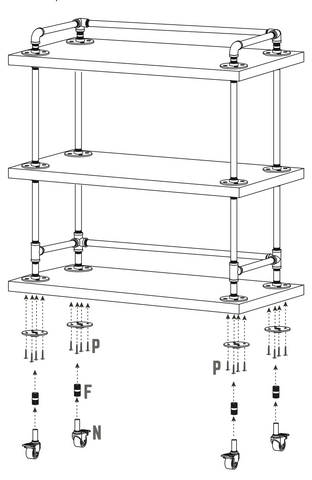
Step 6: Attach remaining 1 – ½“ nipples to the remaining flanges. Attach casters to nipples. Attach each completed casters underneath the base shelf.
And there you have it – a chic, multi-functional three-tier wood shelf bar cart on wheels. With its mobility and sturdy design, this piece is more than just a cart-it’s a conversation starter. With its locking wheels and spacious tiers, this cart promises both versatility and style, no matter how you choose to use it. It’s the perfect piece to set up a bar, host a party, for events, or to save space. Turn it into a coffee station by placing your Nespresso or Keurig on top of the shelves. This versatile bar cart can be used in many ways.
We're introducing some new exciting perks for our members in 2026... Don't miss out.
Leave a comment