
Join our mailing list and get the full PIPE DECOR® experience in 2026
We're introducing some new exciting perks for our members in 2026... Don't miss out.

No one wants a cluttered and messy wardrobe, but sometimes you just don’t have the space to accommodate a closet. Working with a small space doesn’t mean there aren’t any options to get your wardrobe organized. With PIPE DECOR® Freestanding Double Clothing Rack, you can get organized in no time.
In this tutorial, we'll guide you through the process of cleaning and sealing the pipes and fittings and assembling the Freestanding Double Clothing Rack. Let’s get started!
This kit comes with all the necessary parts and hardware you need to assemble the Freestanding Double Clothing Rack.
|
Part |
Description |
Quantity |
|
A |
6 |
|
|
B |
6 |
|
|
C |
2 |
|
|
D |
Connector pipe |
2 |
|
E |
2 |
|
|
F |
6 |
|
|
G |
4 |
|
|
H |
2 |
I know you’re excited to start building, but there’s something really important you need to do first. PIPE DECOR® Freestanding Clothing Rack is made of real steel industrial pipes and fittings. These come coated with a thin layer of oil during to prevent rust during storage and transit. Before assembling, it's important to clean the steel pipes to avoid making a mess.
You can clean your pipes using regular de-greasing dish soap and warm water. Once the oil coating has been cleaned off, dry the pipes with a washcloth. It’s important that the pipes are completely dry before you proceed to sealing.
Sealing is an essential part in preparing your pipe before assembly as this will protect your pipes from rusting and will make it last longer.
You can seal pipes using either a polyurethane matte or satin finish spray or a finishing wax.
To seal with polyurethane spray, simply spray each dry pipe and fitting with a matte or satin finish polyurethane spray and wait until it’s completely dry before assembling.
If you’re going to use wax, simply coat each pipe with finishing wax. Make sure to cover all the surfaces of each pipe and fitting. Wait about 20 minutes before you start polishing. You can use a dry wash cloth to wipe and polish the finishing wax on your pipes. Faster wiping will result in a shinier finish.
Now that our parts are all clean and sealed, let’s get to building!
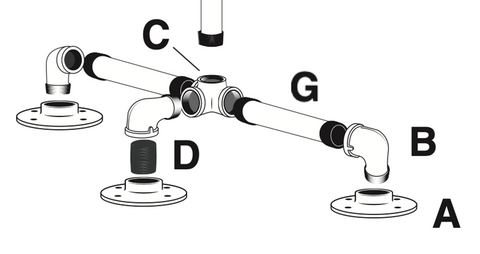
Step 1: We’ll start off with the base of the clothing rack. With the side outlet tee at the center, connect two 8”pipes on either end of it and connect a street elbow to the opposite ends of the 8” pipes. Connect a flange on each of the street elbows.
On the remaining opening of the side out tee, connect a street elbow. Using one connector, attach it to the street elbow with another flange on the other end. Repeat the process for the other hanging rail feet. Refer to diagram below for fitting orientation and connection:
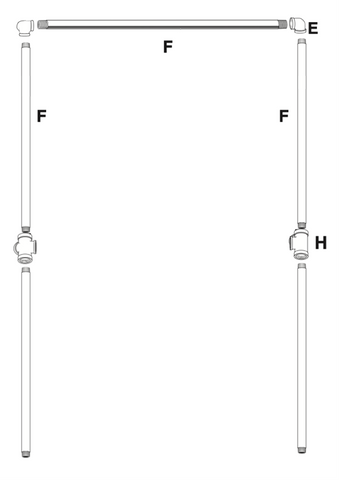
Step2: Connect three 36” pipes with one tee one and one elbow to create an L shape. Refer to diagram:

Step 3: Assemble the other side by connecting two 36” pipes with a tee and an elbow.
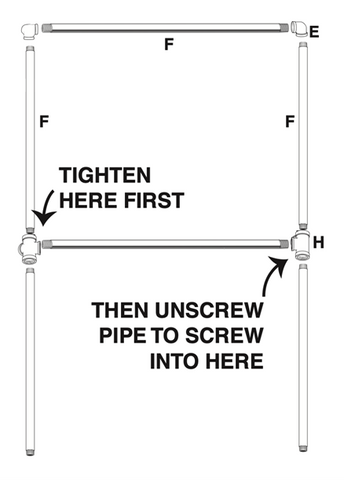
Step 4: Hand tighten F into H as hard as you can.. Then unscrew F to the opposite end. The fit will be loose, but the connection will be secure.
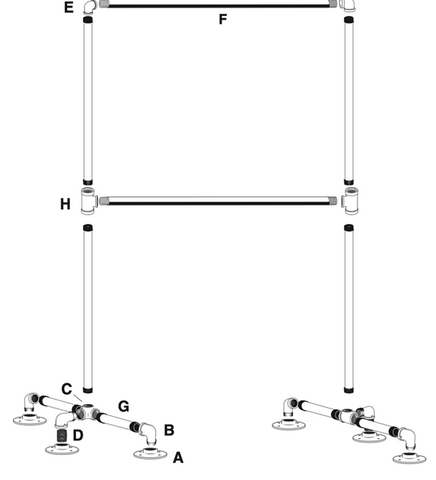
Step 5: Connect the previously assembled feet to complete the clothing rack assembly.
Congratulations! You’ve assembled the PIPE DECOR® Freestanding Double Clothing Rack. This Clothing Rack is the perfect way to display clothing in your shop or boutique, at home in your bedroom, or any room where you need it. You can use this to organize your wardrobe as it is, or you can paint it to match your decor.
Not quite the design you’re looking for? No worries! PIPE DECOR® offers a variety of freestanding and wall-mounted clothes hanging racks you can choose from. If you have your own design, PIPE DECOR® also offers industrial pipes and fittings you can use as materials for your DIY project.
We're introducing some new exciting perks for our members in 2026... Don't miss out.
Leave a comment